What’s a favicon you ask? It’s that little image that comes right before the URL address when a person pulls up a blog or web page (see photo below).
The following instructions will work for any theme on a self-hosted site. Some themes will have a spot for you to put a favicon without going into your server. There are also plugins that you can use, but I prefer to do things without a plugin if I can. It’s also important to note that this method will make a site icon for your site on devices and tablets as well!
Here’s how to make and upload your own favicon onto your blog.
- Open up a program like PicMonkey or Photoshop.
- Create an image that is 16×16 pixels. That’s tiny I know! It’s better to start with a canvas like 400×400 and then use the resize tool once you’re done.
- Save the file as a png or a jpg when you’re finished.
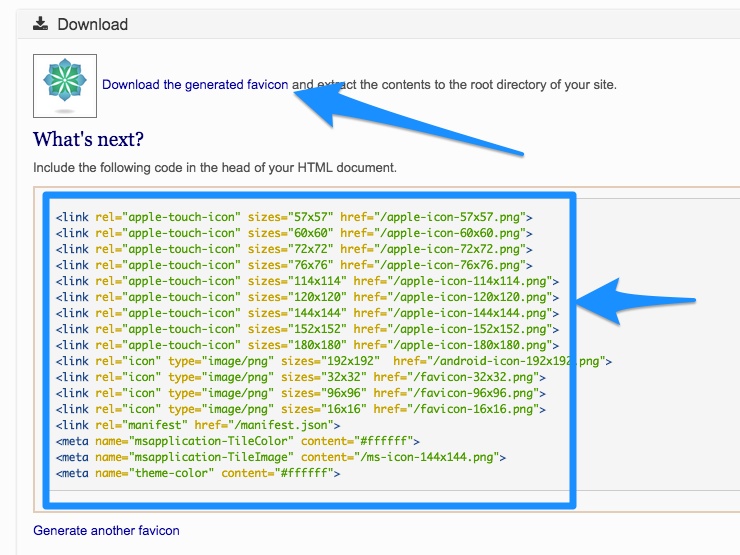
- Now you need to make the image the right type of file for the browser to read. For that, you can use a free favicon generator. I like this one because it creates all the files for various devices. Once you upload it, it’ll give you a file to download plus a bunch of code.

- The code belongs in the head of the document on the website. For Genesis users, go to GENESIS > THEME SETTINGS in the dashboard and insert the code into the header. If your client has a different theme, you may need a header and footer plugin, or it might be in another location in the theme options.
- Next, download the favicon file from the generator and you’ll need to install it in the root directory of the site, server side. The favicon files will be zipped up if you are downloading from Chrome. If you are on Safari, they may come unzipped. The reason they should be zipped is there are multiple versions of your favicon. If it came unzipped during downloading, right click on it and hit “compress” to rezip it.
- Log into the cPanel on the server. For most hosts, this means going to their homepage, logging in with their username and password, and look for something that says HOSTING, cPANEL, or FILE MANAGER.
- Most hosts have an upload function. You just need to know where to put it. If you’re using Genesis, you’ll want to go into the WP-CONTENT folder, then the THEMES folder, then the GENESIS folder, and then the IMAGES folder. You’ll know you’re in the right place if you see a file called favicon.ico. That will be the default favicon you see.
- Other times, you’ll have to go into the child theme folders. Sometimes, you need to put it in the root directory. The point is that it’s not always the same place. You are essentially going to overwrite the default favicon so if you see a file named FAVICON in the directory you’re in, then you are in the right spot.
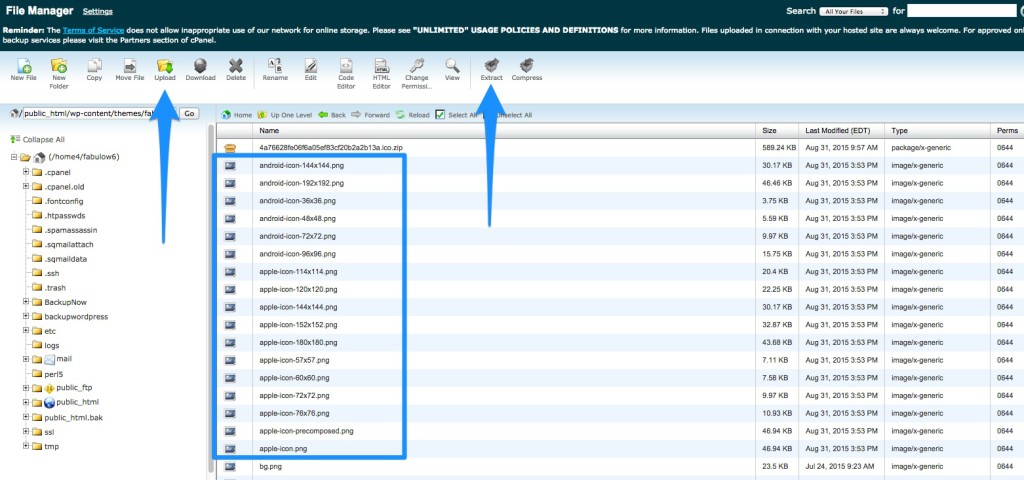
- Click upload and upload the zip file.
- The last thing you need to do is extract it. There should be an extract option in your cPanel. Take note of the screenshot below.

Blogger Favicon Instructions
1. Go to the dashboard.
2. Click layout.
3. Find the favicon box at the top. Click edit.
4. Choose the file.
5. Hit save.
It may take a few hours or days before it shows up. Also, you may not see the change unless you clear your Internet cache and history, but new viewers will see it.
What about WordPress.com?
1. Go to general settings.
2. On the right, click on choose image to display as a blog picture. You can choose a jpg or a png file.
3. Click save!
A favicon is a small detail but helps personalize your client’s site and creates an attractive image that shows up on the reader’s search bar if they bookmark the site.

