As a blog designer and social media consultant, I receive a lot of questions in my email inbox. And you’d be surprised how many are repeats! So I thought I’d start a series where I compile them in a list with no frills answers.
Consider it a grab n go resource guide for you to pin whenever you get stuck! I’m hoping to do this regularly, so if you have a question you’ve never found a great answer to, send it my way at Julie@fabulousblogging.com.
1. I migrated from Blogger to WordPress but I’m losing traffic from backlinks that look like ?m=1. Help!
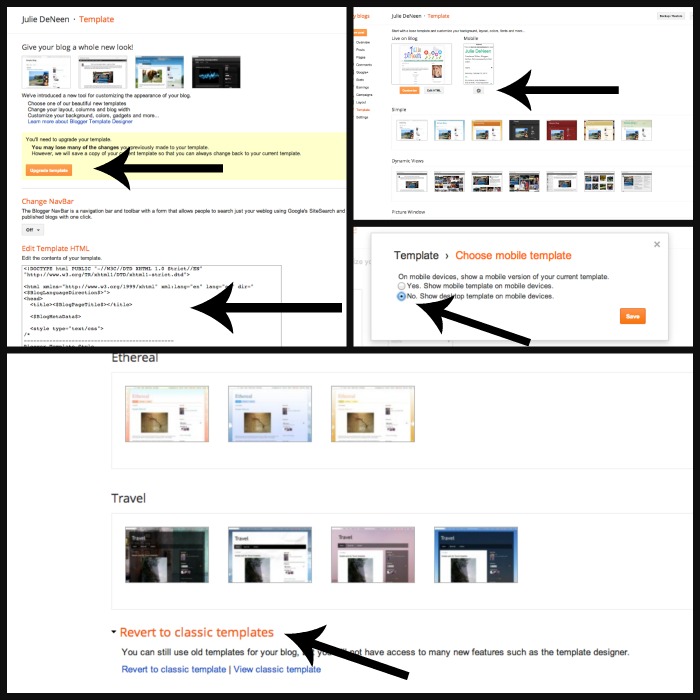
When you migrate from Blogger to WordPress, a designer will usually take your old blog template and write in code that triggers the 301. If however, they did not disable the mobile version of blogger before they did that, any backlinks created with the mobile permalink won’t redirect properly. To fix this problem,
- Click onto template in your dashboard.
- Copy and save the code in your template in a notepad file.
- Then click on update template. Temporarily your 301 will stop working.
- Where there is a mobile icon that looks like a gear, click on it.
- Choose no and hit save.
- Then go to the bottom of the page and revert back to classic template.
- Paste the code you saved back into your theme.
2. Where, what and how do I include a privacy policy on my blog?
As far as the tech end goes, simply create a new page on your blog by clicking on PAGES > ADD NEW. When you publish the page, it won’t be linked to anything yet. You’ll need to decide where you’d like to put it. The menu bar is prime real estate, so my recommendation is to simply create a link in your footer. Your footer can have your copyright, contact info, sitemap, search, and a privacy policy.
Creating a Policy: If you can handle mucking through the call to actions to buy, you can generate a free privacy policy here. Finally, here’s a resource showing you where other popular sites put their privacy policy (in email sign up forms, footers, etc.).
3. How do I find relevant hashtags on Instagram?
There are several ways to get hooked into vibrant communities and feeds on Instagram. To start, if you just want a straight list of the most popular hashtags, there are lists out there on the Internet.
You can also use a browser extension called RiteTag. I have never personally used it, but this blogger writes about her success with it. The idea is that it color codes hashtags as you type them out and tells you if it’s overused, excellent, poor, etc. She mentions both Twitter and Instagram in her post.
Look for Instagram link ups. There are a lot of bloggers who do weekly Instagram parties using a relevant hashtag. This not only gets your photos in their stream, you may also pick up a few new followers!
4. What’s the easiest way to set up a weekly newsletter in MailChimp?
The easiest way is to set up an automatically generated RSS campaign. My Crazy Good Life has a great tutorial on setting up these types of campaigns. I personally don’t use auto-generated email campaigns, simply because I want to have complete control over all the elements of my email. Click through rates are notoriously low for email and I like to craft subject lines that are more likely to convert. Kissmetrics has a great post about email creation tips.
I like to use this quick tip to create beautiful newsletters. I simply make a template, and use the HTML I’ve already generated in my post and paste it into MailChimp. If you are a visual learner, you can see me playing in Mailchimp during a Google hangout below.
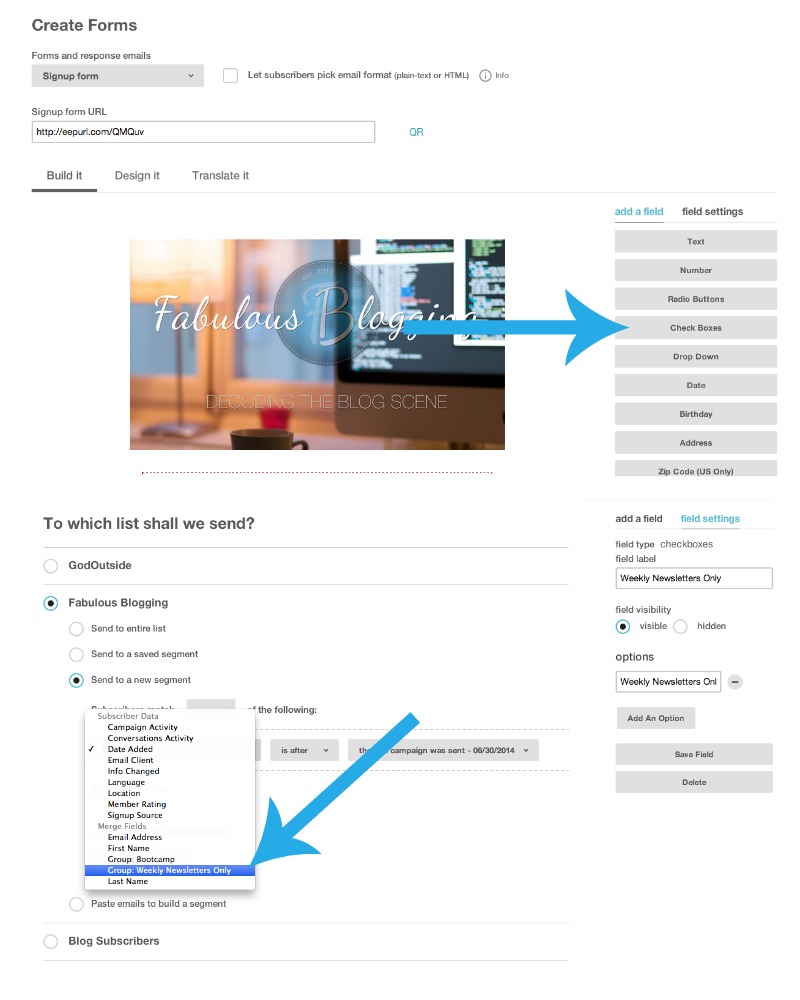
Follow up Question: How can I have people sign up for a Daily and/or Weekly Newsletter?
The easiest way to do this is to set up your sign up form with checkboxes so they can choose. Then, when you send out email blasts, you can filter the emails based on their preference. First, edit the sign up form by adding a check box. Then customize the check box. Finally, when you send an email blast, use the “send to new segment” option and choose those who checked off Weekly Newsletter Only.
5. I don’t understand what services I need from my host provider
There are a lot of options — many you don’t really need, so here’s the basic breakdown of a typical hosting plan.
Your Domain Name: This can be bought virtually anywhere and costs the average person about $12.00 a year. Some companies may be cheaper than others. If you bought a domain name through a small company, it doesn’t mean you have to host with them. I recommend you host with a company that has a well-known reputation. If you have a domain name with one company and your hosting with another, you’ll have to adjust your nameservers and then you can manage your domain and hosting from one cPanel.
Your hosting package: The average blogger can get away with a shared hosting package. This means you share a server with other clients in exchange for a reduced rate. The average shared hosting plan costs between $4-8 a month. When you get a hosting package, you are also *usually* getting the option for a custom email address as well. Hosting packages vary slightly — for example, some allow unlimited number of domains and new sites — others have a cap. Some will charge you to retrieve an emergency backup, some won’t.
Domain Privacy: This costs $10.00 a year and hides your information from the public. Should someone want your domain name, they’d not be able to harass you for it. This is an option when you sign up for your account.
Professional Backup Services: This isn’t necessary since there are plenty of free ways to back up your blog. However, if you are the kind who can’t stand to think about it, Hostmonster for example charges $1.67 a month for backup services.
Don’t be afraid to send me an email with your questions! Please label it Quick ‘n Dirty in the subject line and send it to Julie@fabulousblogging.com. I’m working on a resource sheet with all the questions compiled and answered, so check it out!


