Despite the relatively boring title, I’m going to give beginners a step by step process that will help get your site seen by search engines. Using this post, I’m going to show you the process I went through to design this particular blog post. Don’t let SEO or SERP acronyms scare you. It’s basic common sense plus a few “insider” tips.
Go to Google and Act Like a Reader
More than any other tool I’ve found, sometimes the best way to discover the right keywords for your post? Simply go to Google yourself. I had an idea. I wanted to write a post for beginners about SEO. I went to Google and typed in, “SEO for Beginners.” I noticed a lot of big-hitting blogs were listed on the first page. This means it will be difficult to beat the competition.
Next, I tried thinking like a new blogger. How would they type in a query? They might not use the terms SEO or even Search Engine Optimization. They might type in something like, “How to Get Google to Notice my Blog”. I tried that term and noticed a bunch of big blogs at the top.
Okay keep going. Next, I tried “How to Get Google to Index a New Blog”. Nope. The same big blogs.
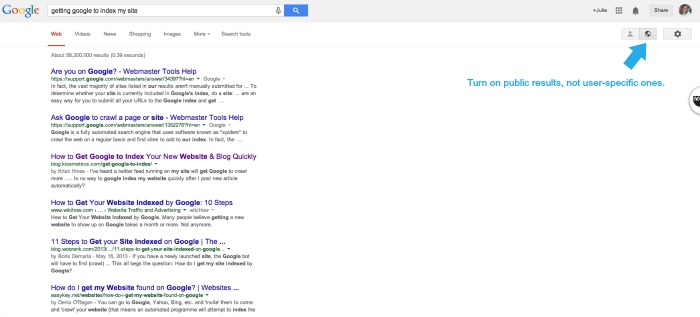
Notice a pattern? It’s a lot of trial and error. I persisted. Next I tried “Getting Google to Index My Site”. That’s when I noticed…the top two search results were helpdesk pages. That’s a sign that the keyword isn’t yet dominated. There was also a forum answer (another good sign), WikiHow (good as well!) and only one big blog with a result at the top.
Takeaway: When you find a 1st page of search results that have forum answers, ehow, wiki, and other nonsense sites, you know you are in a good position to dominate that keyword/s.
Create Two Titles for Your Post
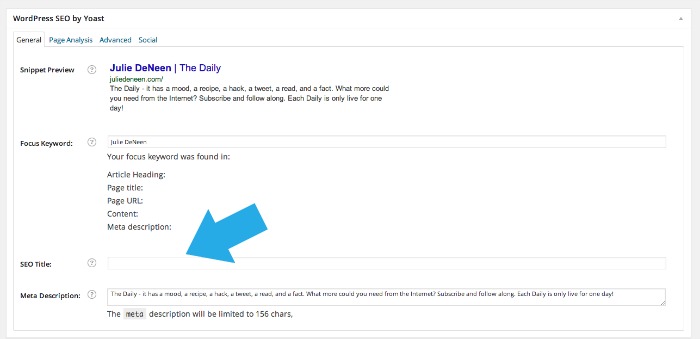
You’ve got your title and I have mine. I’m going to use this title as my SEO title. If you are on a self-hosted WordPress site, you’ll want to install the SEO by Yoast plugin and use it so you can have two titles for your post. One title is the very descriptive, robot-friendly, query-friendly title. Then you can use a fun or “teaser” title as your regular post title. This will appear underneath your post as you’re typing. Don’t worry about that keyword slot. It can mess people up.
My post has two titles – one for social sharing and one for search engines.
You also want these keywords to be in your PAGE URL. Right underneath your post title, click the edit button and type in your title using hyphens as your spacers.
You’ll notice as I still have my boring title in the main post title area. That’s because when you type that in, it will auto-generate your permalink. Once the permalink is generated, I write something a bit more “viral” friendly.
Write your post like your life depends on it!
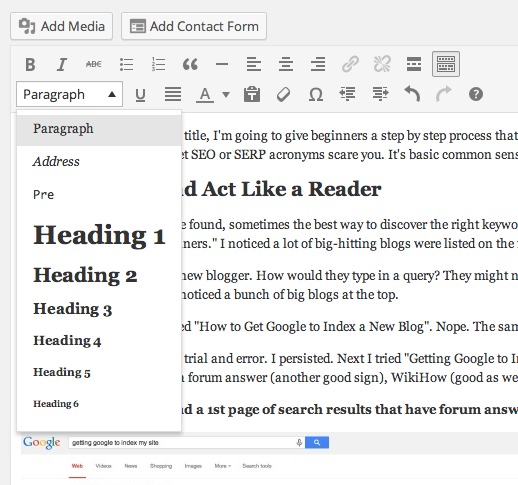
More than anything else, you want to be THE source for the information you are writing about. Quality, quality, quality. Include descriptions, photos, video, and formatted text so there aren’t big walls of text. You also want some of your title words to be in a formatted heading. Simply create a heading and use the paragraph tool to highlight in a Heading 1, 2, 3, etc. Statistcally speaking, posts that are between 1000-1500 words do the best.
Indexing Your New Blog
So you write the post and hit publish. Your next job is to share the post in several different places. Google pays attention to social shares as well as your keyword research. Put it on Twitter, Pinterest, Google plus, Facebook, and anywhere else you think people might enjoy your work. Make sure to create images that are particular to that platform!
Some people like to submit each new post to Google’s directory. This isn’t really necessary as Google’s spiders should find your post organically. But if you have a post you’ve recently updated or changed, you can use the manual submit tool from Google Webmaster Tools. The better thing to do though…is to have a sitemap. A sitemap is simply a map of your site.
Submit your Sitemap to Google
- Verify your site with Google webmaster tools.
- Then you can submit a sitemap.
- The SEO by Yoast plugin has a sitemap feature installed.
- You can grab the URL of your sitemap generated by the plugin and submit it to Google. Look under XML sitemaps in the SEO settings on the dashboard.
- You can resubmit a sitemap every couple months if you wish.
Detailed instructions are here!
Don’t forget those meta descriptions!
Meta descriptions (or excerpts) are little summaries of information that show up underneath the title in search results. If you have Yoast installed, the meta description will be right below the SEO title. If you don’t, you can simply use the excerpt box that comes with WordPress. Don’t see it? It might be because you haven’t turned it on in your Screen Options. Go to the top of the page and click the Screen Options tab. Click the box that says “Excerpt”. Think of a meta description like a tweet. It’s 150 characters and you want to make sure you have a keyword included somewhere in the description.
Fill out all the other YOAST options that you understand
Most of the advice above is on a per-post basis. However in the SEO by Yoast settings, there are several other fields you can fill out.
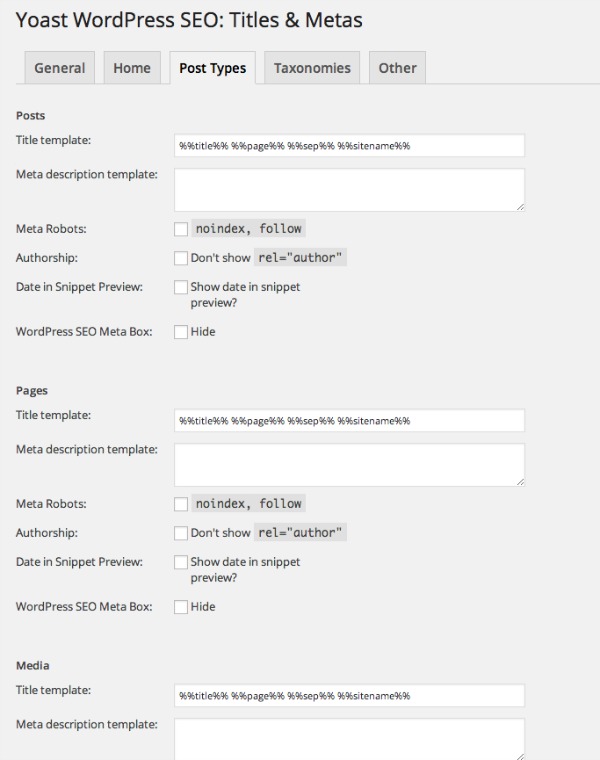
Go under the SEO setting in your dashboard and click on TITLES & METAS. You’ll want to click on the tab that says POST TYPES. These are areas where you can write a default meta description if you don’t specify one for every single page, post, and media file on your blog. Fill them out with a generic (but specific to you) summary of your site, making sure to include the keywords you want to be known for. You can do the same for any tag archives and whatnot.
There is also a bulk titles and metas editor in the SEO menu that will save you a TON of time!
Use the Enhanced Distribution Module for Jetpack
Jetpack is a great plugin and has many features you may not know about. If you are running it, make sure you have the module called ENHANCED DISTRIBUTION turned on. It will ping directories and search engines when something new is published.
Label your images with descriptive titles
Do not upload an image that is titled IMG_2041.jpg. You want it to have a specific title. Put the title in the ALT text box as well. This increases your chance of it getting seen in Google images. And believe it or not, the YOAST plugin allows you to fill out a separate title and meta description for every single image on your site!
Work on Your Niche
Sometimes I feel like I sound like a broken record, but having a niche makes quite a bit of difference in your authority as a blogger. If you write about everything under the sun, it’s less likely your posts will gain the ranking you need to bring in thousands of visitors (barring social infamy of course). Both my niche blogs — this one and my religious blog — do better than my personal lifestyle blog, simply because all the posts stay on the same general topics.
It’s Never Just One Thing
It’s a lot of things combined — niche, excellent titles, great content, lots of social shares, good meta descriptions, images with proper titles, keyword research — this all leads to the desired backlink. A backlink is when some other site {the bigger the better} links back to you. Keep plugging away on each post and you’ll start to see results! It just takes one post to rank on the first page of search results to see a major traffic boost!

