As a blog designer and social media consultant, I receive a lot of questions in my email inbox. And you’d be surprised how many are repeats! So I thought I’d start a series where I compile them in a list with no frills answers.
Consider it a grab n go resource guide for you to pin whenever you get stuck! I’m hoping to do this regularly, so if you have a question you’ve never found a great answer to, send it my way at Julie@fabulousblogging.com.
1. How do I deal with awkward spacing in the WordPress edit screen?
Let me start by saying that some themes are more obnoxious than others. Since using Genesis and Prophoto exclusively, I find I have a lot less trouble with strange spacing issues. The most common problem for people is that they want to write a list and make the spacing smaller than you would simply by hitting enter.
This doesn’t look cool.
It looks lame.
There’s too much space.
So to solve that, you can do two things — either hold down the shift key and hit enter (which is quick and dirty and I’m not really a fan), or– simply write out your list the ugly way, highlight the whole thing, and then hit the bullet or numbered list option.
- This doesn’t look cool.
- It looks lame.
- There’s too much space.
- Voila!
When you want to break out of the list and continue writing, hit return twice. The general rule of thumb is this. Write out your posts without using anything fancier than a simple return. Go back at the end, and use your bullets and numbers, or your headings to jazzify your text!
2. How do I make a link a no-follow link in a sponsored post?
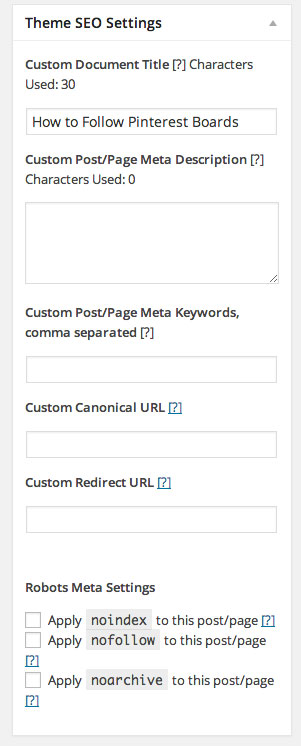
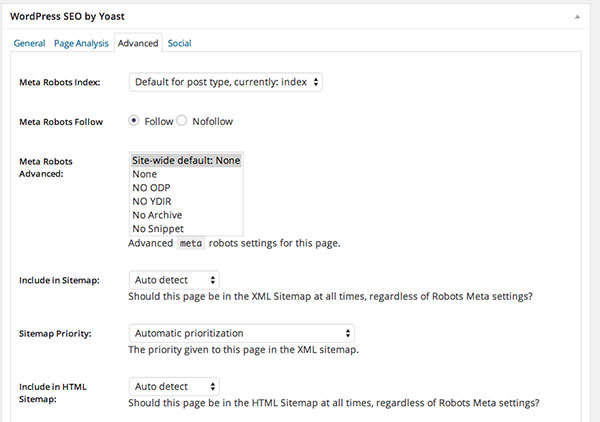
If you have Genesis (or the Yoast plugin), there is a simple box to check off. In Yoast, you must go underneath the edit screen, click on the advanced tab, and click NO FOLLOW. This will make all the links in the post no follow. If you want to simply make one link no follow, you’ll have to go into the HTML view of the post and add this piece of code to the URL.
The normal link should look like this:
<a href="http://www.example.com">My Sponsor Link</a>
Adding the no follow tag looks like this:
<a rel="nofollow" href="http://www.example.com">My Sponsor Link</a>
Simply add the rel=”nofollow” after the a.
3. How do I submit a sitemap to Google webmaster tools?
To start, if you haven’t verified your site with Google yet, you should. These webmaster tools give you an inside look at the health of your site from Google’s point of view (and we all know how important that is)! This post goes through how to verify your site with Google.
If you have the Yoast plugin, the sitemap will be automatically generated for you. Click on the SEO tab in your dashboard, then click on sitemaps.
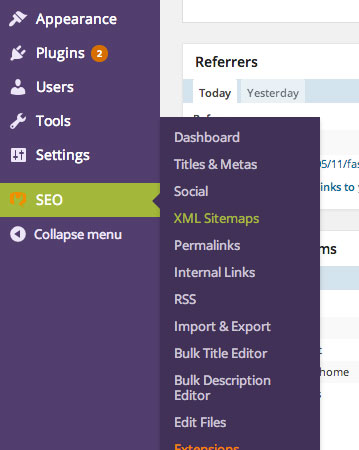 Click on the button that says XML sitemaps. You’ll have a page that pops open…
Click on the most recent one. Copy and paste the URL at the top and that’s the one you want to submit to Google.
- Go to webmaster tools.
- Click on your site.
- Click on sitemaps.
- Then click ADD/TEST sitemap.
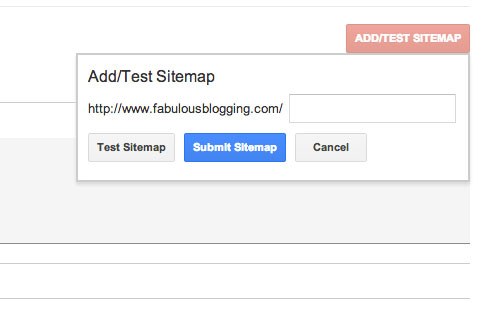
- Paste the URL into the field (you may have to delete the first part of the URL since Google automatically generates it).
4. Where can I find the visitors vs. pageviews using Jetpack site stats?
If you are on self-hosted WordPress, the jetpack plugin allows you to view the stats, but there is no option for unique visitors. BUT, if you go to your WordPress.com account, you can see what’s called enhanced stats. There, you’ll be able to see the visitors vs. views.
What’s the difference?
A pageview is a click. If I read your site and click on ten posts, that’s ten pageviews. Visitors tracks IP addresses. So it only counts me once, even though I’m clicking through your site. Most brands want to know pageviews and visitors separately. If you have a ton of pageviews compared to your visitors, that means that people are landing on your site and staying to read multiple pages. That’s a good thing!
5. How do I get a custom email address that matches my blog and then how do I access it?
Most hosting companies have an EMAIL tab and you can create multiple email addresses once you’ve bought a URL. I have Julie@fabulousblogging.com for example. However, the email interface is usually lame, and most people want their custom URL to get forwarded to a gmail address.
When you do this, you can receive and write email from that address and GMAIL will separate out emails from your personal address vs. your custom one. To set up your gmail to receive a custom email….
- Click on the gear and click on settings.
- Click on accounts and import.
- Click on the blue link that says ADD ANOTHER EMAIL ADDRESS YOU OWN.
- Uncheck the box that says treat as an alias, and type in your new address.
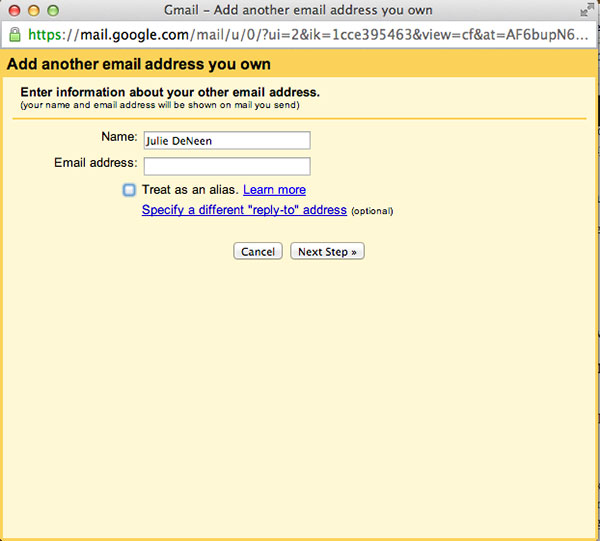
- After you hit next, fill out your username and password. Your username IS YOUR EMAIL ADDRESS. After you type your password, hit next.

- Then it will ask you to send a verification file. This should be the only time you have to access your custom email from the clunky web client (it’s different for each host).
- Log in and grab the code. Paste it into the box and then hit save.
- Now you are able to respond as that email, but we have one more step.
- In the GMAIL settings, click on ADD A POP3 ACCOUNT you own.
- Fill out the same information again. Then hit add account.
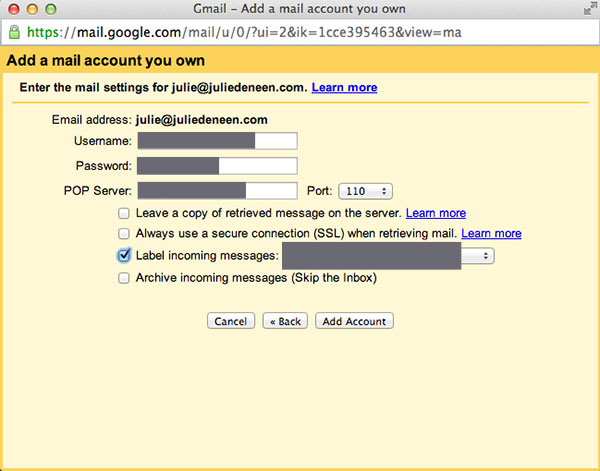
- Lastly, in the account settings on GMAIL, set it so that the default email you are using is set to “reply from the same address it was sent to”.

6. How do I get my Twitter share button to pull my Twitter handle automatically?
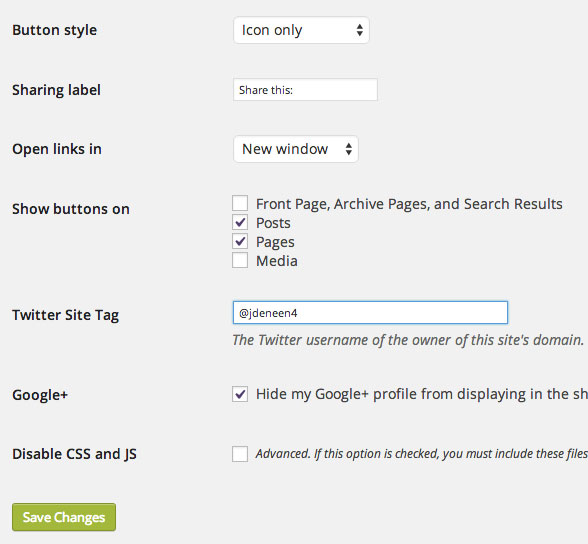
I love the jetpack sharing buttons. So easy and clean. Activate that module in jetpack, then go to its settings (SETTINGS > SHARING). Where it says Twitter site tag, add your handle without the @ sign. Hit save!
Don’t be afraid to send me an email with your questions! Please label it Quick ‘n Dirty in the subject line and send it to Julie@fabulousblogging.com. If you’d rather hit me up on Twitter, just use the hashtag #FBQuicknDirty. See ya on the Interwebz!
