 If you are using WordPress for your blog, you’ve probably heard of the plugin called Jetpack. I get a lot of questions about Jetpack — its function, its connection to WordPress.com, as well as how to use it. So today, I’m going to decode the mega-plugin for you. I’ll explain how to get it on your site and what each module does, and help you decide whether or not you need it for your site.
What is Jetpack?
Well, technically, it’s a plugin, but I like to break things down into plain English. In order to understand Jetpack, you first have to know that there are two arms of WordPress:
WordPress.com and WordPress.org
They are ill-fitting names, and have confused thousands and thousands of bloggers, but it’s hard to change blog lingo after the fact. The point is this: WordPress.com is like a social media site meets blog community meets RSS reader. It’s a place where you can sign up for a free blog, network with other bloggers, keep all your blogs in a neat little RSS reader, and have a blast. It’s free (but it offers paid upgrades for fancier design, custom URL addresses, etc. etc.). WordPress.org is the alternative for people who can’t (or don’t want to) follow the terms of service that WordPress.com requires. Since WordPress.com users are renting space for free on their servers, there are rules– the biggest one being “no custom plugins allowed.” You also can’t display any advertising or affiliate links on a WordPress.com blog. WordPress.org is simply a shorthand way of saying that you are using the open source, not-for-profit, free version of WordPress to customize your own site. You have your own host, domain name, everything. In order to entice people to use WordPress.com, the company offers all sorts of cool features, such as site statistics, a simple-to-use email subscription widget, shortcodes for embedding forms and videos, et cetera. These features are very handy, because bloggers aren’t allowed to download custom plugins, and so their blogs have to be outfitted right out of the box. When people would migrate to their own website and use WordPress.org, they were often upset to realize all these extra features didn’t come built in to the basic WordPress.org software. And thus, Jetpack was born.
It’s a backpack, people!
Jetpack is a toolbox, or backpack, full of mini-plugins. If you really felt like installing 30 separate plugins, you could probably find them and get your site to do all the things Jetpack can do. That’s the beauty of Jetpack. It’s just one plugin. 
How do I get Jetpack?
Many hosting companies install Jetpack with the 1-click WordPress install. However, it is not yet activated. If your WordPress site didn’t come with Jetpack already installed, you can get the plugin here. Once you’ve downloaded the plugin to your computer, go into Plugins > Add New. Click on the “Add New” button. Choose the zip file on your computer and hit upload. Click Activate. This doesn’t activate Jetpack fully; it just gets it set up on WordPress. 
Activating Jetpack
In order to get Jetpack working, you need to connect it to a WordPress.com account. I know, I know–but you’re on WordPress.org! This is one of those sticking points for people. Even if you are using WordPress.org to run your own site, you need an account with WordPress.com in order to use Jetpack. Remember how I said WordPress.com was like a social media site? It’s possible to get an account without having to use their blog service. Just make sure that when you go to WordPress.com to get your account, you specify that you only want a user name and not a blog.
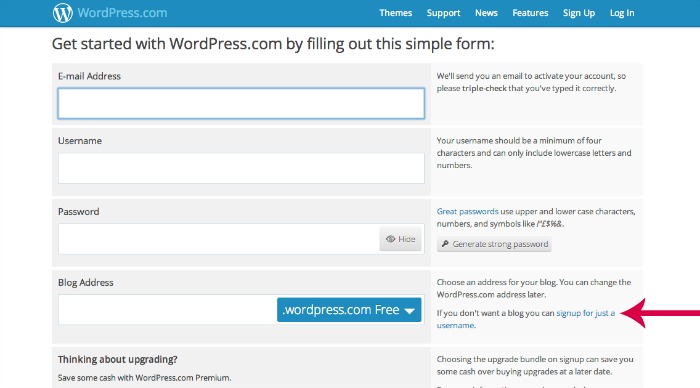
Once you have your WordPress.com username and password, click on JETPACK on your WordPress dashboard. Enter them and hit connect. Jetpack is now fully activated on your site. 
How do I turn off modules I’m not using?
When you first activate Jetpack, most the modules automatically turn on. My recommendation is that you keep on only the ones you will use for the sake of speed and load time of your site. Here’s how you deactivate any you aren’t using. Click on Jetpack on your dashboard. Then click on settings. Check off the ones you want to deactivate and then choose the option that says deactivate (you’ll see where it says BULK actions — that’s the menu you want). Then click Apply. 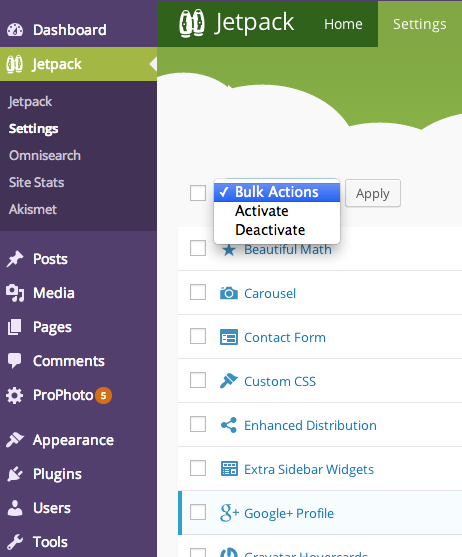

Which modules do I really need?
There are 30 of them to choose from, and clicking on the title of each one will give you a brief synopsis of what it does. Here are my recommendations!
1. Carousel
This module turns your WordPress image galleries into an easy to scroll-through-carousel when users are clicking on your photos. If you don’t have the carousel turned on, every image click opens a new page (which is a bit less efficient). Clicking on the images below will give you an example of the carousel in action.
2. Contact Form
This module gives your site a simple to use contact form that you can edit. Once active, there will be a button on your edit screen that says, ADD CONTACT FORM. When you click on it, you can edit the fields, add and delete, and then insert the form into a post or page. 
3. Extra Sidebar Widgets
This module allows you to add widgets to your sidebar without knowing code. For example, if you want to add an image to your sidebar, you normally have to write the HTML with the file URL of the image. The extra sidebar widgets give you an image widget that’s a plug and drop feature. It also allows you to display galleries, top posts (based on site statistics), Twitter timelines and more. 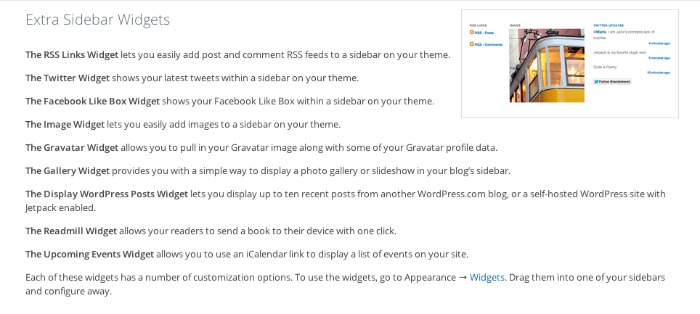
4. Jetpack Comments
This module will only work with some themes (for example, Prophoto does not allow Jetpack comments. Even if you have the module active, it won’t work). Assuming your theme is compatible with Jetpack, turning it on allows your readers to quickly comment using either a WordPress.com account, Twitter, or Facebook. Without Jetpack comments, readers are required to enter a name and email address. 
5. WordPress.com Stats
If you are confused by Google Analytics, you aren’t alone. There is so much data that a beginner can’t begin to sift through. The WordPress.com stats are reliable, intuitive, and easy to read. Once activated, you can click on JETPACK > SITE STATS to see real-time statistics. 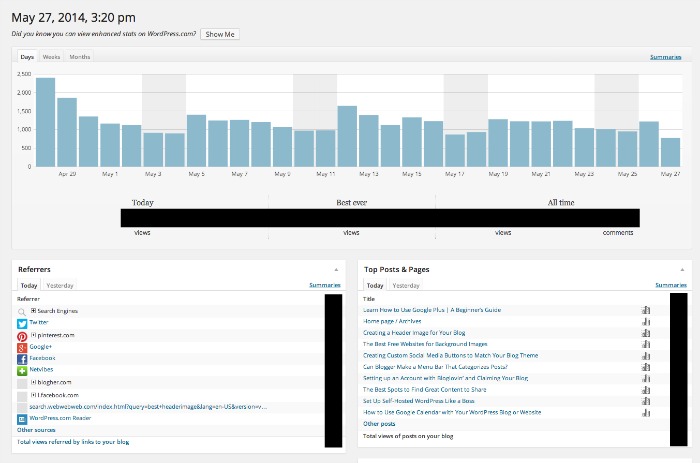
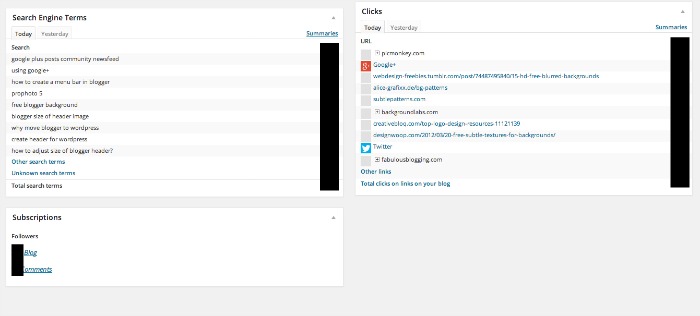 The graph at the top shows you the general pageviews over the month. Clicking on any of the bars will take you to detailed summaries of that day.
Referrers: These are all the places where your traffic is coming from on that particular day. Clicking on the summaries allows you to see your all-time traffic referrers.
Top Posts & Pages: Every page or post that was clicked on on that particular day.
Search Engine Terms: The keywords people typed in that led them to your site.
Clicks: This shows you what links your readers are clicking one when they move off your page.
Subscriptions: If you have the jetpack subscriptions module turned on, this is where you’ll find who has subscribed.
6. Sharing
This module allows you to add sharing icons at the bottom of your posts and pages. It’s a lightweight and easy way to encourage your readers to share your content, and includes all the popular sharing sites like Facebook, Twitter, Pinterest, Google +, Stumble upon, Reddit, and Email. You have the option to show them as icons, text, or the official buttons with the number counters (as shown below). 
7. WP.me Shortlinks
This module cleans up your URLS. When you’re sharing posts on your blog (on Twitter especially), it’s nice to have a short little link that’s compact. HootSuite is a program that will do it for you as well, but the WordPress WP.me Shortlinks module will create a custom URL for every post. All you have to do is hit Get Shortlink next to the permalink in the main edit post screen. 
8. Subscriptions
No blog is complete without an email signup. If you aren’t collecting an email list with a 3rd party program like MailChimp or Constant Contact, Jetpack’s subscription option is easy to use and lightweight. It can be placed in a widget area on your sidebar, or– if you have shortcodes turned on, you can type in [jetpack_subscription_form] anywhere on your site and it will appear. Your subscribers appear in the stats area. 
9. Sidebar visibility
This module is incredibly useful (I use it on my site). If you have a crowded sidebar, use the Sidebar Visibility plugin to write rules for each widget. This way, you can have certain posts appear on certain pages, and not others. I’ve written an entire post about this module! 
10. Shortcodes
“Shortcode” is simply a fancy term for the word “shortcut.” It allows you write some simple code to do a more complex task. A perfect example is a YouTube embed. Rather than writing out the code, you can simply add brackets and the following code [youtube=”http://theurl.com”]. Shortcodes activates several different options for embedding other media onto your blog. One of my favorites is the archives shortcode. You’ll see on my index page that there is an aut0-created list of every post I’ve written. 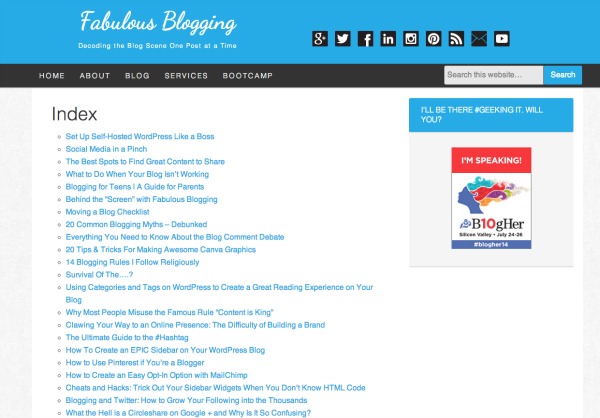

Other modules you might use…
Think carefully about what modules you can’t live without, and which ones are simply an extra perk. Every active module does add a bit of bulk to your site, so I recommend adding one at a time, and testing your site’s speed before adding too many at once. It’s possible that if you need some functionality (like for example, a backup service, you might consider asking your host provider first).
Mobile Theme: If your theme is not responsive, the Jetpack mobile theme gives your site a simplified look on smartphones.
Omnisearch: This little module gives you a search bar for your site (to display in a widget). If you are on the Genesis framework, you don’t need omnisearch as the theme itself comes with a search option. It’s in the navigation extras area.
Related Posts: If you are tired of using Zemanta or nRelate to put a list of related posts at the bottom of your blog, this module will do it for you. 
Which modules can you do without?
Here are the ones that I deactivate on a client’s site, simply because while they have a “cool” factor, most people don’t miss them once they are gone.
Beautiful Math: Unless you are a mathematician, this isn’t necessary.
Custom CSS: I’ve found that most frameworks come with a built in CSS editor for the theme. Genesis, Prophoto, Thesis, and Weaver all have separate areas and don’t use this module.
Gravatar Hovercards: This module allows your commenters to have their hovercard displayed next to their comment. It’s cool, but the truth is that when you leave a comment, there is a backlink (to either your blog, Facebook, or Twitter) anyway. Skip this one if your site is loading slowly.
Infinite Scroll: This module only works with some themes (and you’ll find that other themes have it built in). Infinite Scroll allows your posts to continually load without having to hit “older posts”.
Jetpack Single Sign-On: The only benefit to this feature is that you can use one username and password to log into your WP.com account and your blog. It’s not necessary.
Likes: This little button is equivalent to the Facebook like. It’s a standard feature on WordPress.com blogs, but it doesn’t have any other use except to make the blogger feel good (or bad if you don’t get any likes)!
Monitor: In my opinion, a lot of monitoring plugins do more harm than good. If your site goes down for a few minutes in the early morning, you probably don’t notice. You don’t need an email to tell you that. And, if your site is down long enough to impact traffic, you’re going to notice anyway.
Notifications: This module adds a black bar with an orange notification box when you have a new comment. Since new comments are usually also sent to your email, it’s really not necessary.
Post by Email: This module isn’t necessary because WordPress has an app that you can use to easily post. Plus, your formatting options aren’t as extensive through email. Save yourself the trouble and do it from an app or from the dashboard.
Publicize: This module automatically sends your post out to social networks. I’m not a fan of publicize because I like to control exactly when I send out my post on each social network (according to the busiest times of the day).
Spelling & Grammar: Most browsers already have spellcheck. You don’t need the additional bulk.
Markdown: This provides you with simple keyboard shortcuts when writing posts. I don’t use it, but it might be helpful if you are the kind of computer person who hates to reach for his/her mouse.
Site Verification: This module is unnecessary since it’s relatively easy to verify your site without a special plugin. If you are using the SEO by Yoast plugin, you’ll also not need the Site Verification.
VideoPress: This module allows you to embed videos right onto your blog (when hosted on your server). Unless you are an avid vlogger, YouTube and Vimeo are easy video hosting platforms and you can embed them right into your site. There is no need for VideoPress. 
But My Site is Slow!!
Don’t panic. My recommendation is to deactivate Jetpack entirely by going to the plugin list, finding Jetpack, and deactivating it. See if your site speeds up. If it doesn’t, it’s possible it’s another plugin that’s the culprit. Deactivate your plugins and start by slowly adding them back one by one– waiting about an hour to see how fast your site loads. If you love Jetpack, activate it first, deactivate all the modules you don’t need, and then test your site. Sometimes it’s not Jetpack that’s the problem, but the relationship Jetpack is having with another plugin. It takes some trial and error, but you should be able to enjoy the features of Jetpack without it impacting your site. *There are a few modules I did not mention because I am either neutral or don’t know enough to comment intelligently 🙂
GoDaddy Managed WordPress is built from the ground up for maximum performance, security and ease of use. Click here to experience the difference.


