 The following post will (hopefully) give both newbies and veteran bloggers some new and helpful information about using images in WordPress. Since it will be a long article, I’ve included a table of contents here those who want to jump to the right section.
TABLE OF CONTENTS
- How to wrestle one image into a post
- Getting two images to post side by side
- How to upload a gallery
- Activating gallery options with jetpack
- Posting a photo from another site
- Understanding the media library
- Changing the global settings in the media library
- Using the Featured image option in WordPress
- My number one advice for unruly images
HOW TO WRESTLE ONE IMAGE INTO A POST.
I use the word wrestle because so many of my clients say, “Images in WordPress are hard!” It is tricky to get the photo just the way you want it. For beginners, they assume it is user error– when in fact, all of us know the pain involved with trying to align an image just so.
Before I give a tutorial, I want to answer one question that people ask: “When uploading images, should I first upload them to the media library or should I upload them when I’m working on the post?”
I do both– depending on the action. This will be clear later. But for now, if you are a beginner, I would avoid the media library. Just work right within the post.
1. Place your cursor in the exact spot you want your image to go.
2. Click the add media button.
3. When the screen first opens up, you’ll see this.

4. Make sure the INSERT MEDIA on the left is bolded and click on the blue UPLOAD FILES button.
5. Find the image on your computer, and then click open.
6. The image will begin to load.
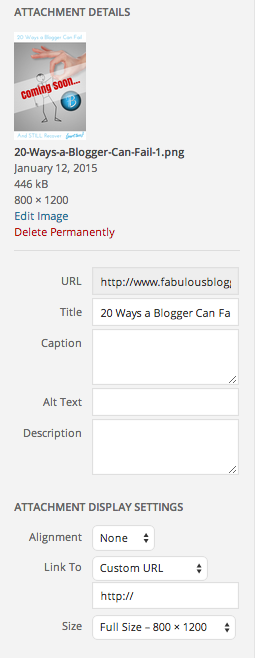
7. Before you click the blue button that says insert into post, you’ll want to make some changes. On the right hand side, fill out everything you can. This will help with SEO.

A couple things to note:
You can change the alignment or the size of the photo displayed. And what about that thing that says “Link to” media file? Basically, you have two options. When someone clicks on the image, it will either take them to a larger image of that file, OR it can take them to an attachment page. All that means is your photo is displayed in a page with your blog theme surrounding it. Otherwise, the media file will be on a white screen. You can also send people to a custom URL when they click on the photo.
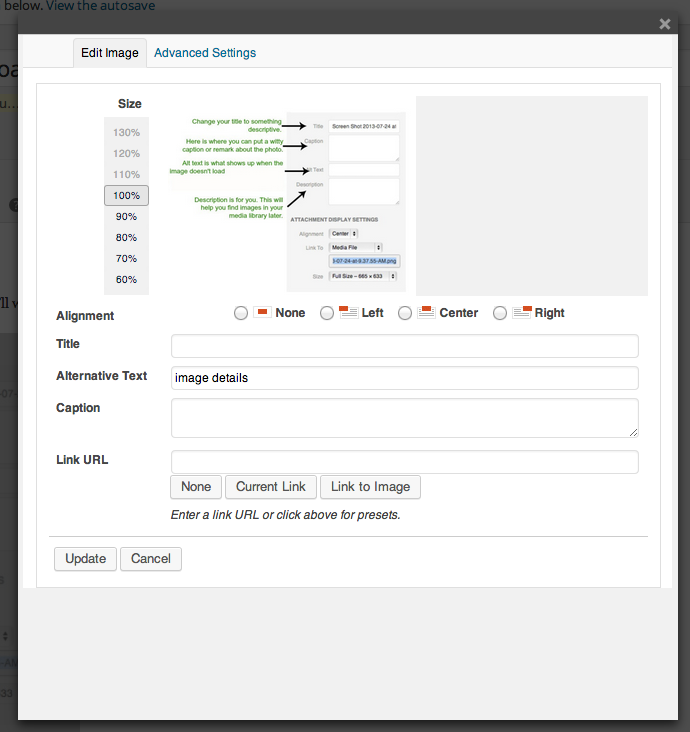
8. If you look at it in the post and it’s too big, click on the image. It will change color and you’ll see two small icons in the top left. Click on the one that looks like a photo. This is what will come up.
![]()
You can change the size by clicking on the percentage. Keep in mind that you can only make the images smaller once they are loaded.(Technically that’s not true, but it’ll look fuzzy so just go with it). What if you want the picture to take people to a link? This is the place you can do it. See where it says Link URL? Just put whatever URL you’d like the image to take people too!
*This works when uploading a single image, but not in gallery modes. Just a note.*
GETTING TWO IMAGES INTO A POST SIDE BY SIDE
Ahahahaha! Funny funny. I laugh because it sounds so easy, BUT IT ISN’T. Here is my recommendation. Use the PicMonkey collage software. Free, easy, and no registration required. If you have two images side by side, the easiest thing to do is to turn them into one image. Sandra Sallin over at apartfrommyart does this all the time (though she uses a different program). Go check her out! If you need a tutorial on PicMonkey, start here.
Anytime you want to have multiple images in a row, I’d go with a gallery. WordPress has all sorts of fun features that make galleries and slideshows easy.
HOW TO UPLOAD A GALLERY INTO WORDPRESS
1. Put your cursor exactly where you want the image gallery to go.
2. Click upload media.
3. When the window comes up, choose the option that says “CREATE GALLERY”
4. Find your photos on your computer. An easy way to upload multiple photos is to click on one, hold down the crtl key on the keyboard, and select as many photos as you need. WordPress will upload them in a batch.
5. Once they are uploaded, click the blue button at the bottom that says create gallery. Here is where you add all your details.
6. At this point, you can have it display thumbnails or a mosaic. If you have jetpack installed, you can activate gallery features that make those options possible.
- Thumbnail Grid: This will put a thumbnail of each image and line up in columns according to what you specify (you can make it 2, 3, 4 columns with the option right above). When you click on the image, it opens up a dynamic carousel IF you’ve activated it. Keep reading.
- Tiled Mosaic: This is a fun pinterest-style arrangement of your photos. It places them in your post as a big rectangle with a collage of your photos. When you hover over the photo, a caption appears.
- Square Tiles: This will be a modification of the thumbnail grid but with larger photos.
- Circles: Quirky and fun option. It’ll put all your images in a row, but in circles!
- Slideshow: This will show up like a TV screen on your post and the images will automatically slide through.

HOW TO ACTIVATE THE IMAGE DISPLAY FEATURES IN JETPACK
1. First, make sure that you have Jetpack installed.
2. Then click on Jetpack on the left hand menu bar.
3. Click on Jetpack again (since you have the option of clicking on other stuff like site stats). When the page pops up, look through all the widgets. You want to make sure you have all the following activated: Tiled galleries and carousel.
WEIRD ISSUES WITH GALLERIES
There are a few things to know if you are a beginner.
1. I wouldn’t put more than one gallery in a post (it’s not really set up to do that unless you use shortcode).
2. HOWEVER, you can have individual images uploaded throughout your post and then also one gallery.
3. Sometimes if you want to edit the gallery, when you go to click on it, it disappears (or becomes really small). Don’t panic. It’s still there. Just click on the text tab at the top of your screen, then click back to visual. It should be there.
4. If you forgot a few photos, no big deal. Click on the gallery that’s in the post. On the left side, there will be an option that says ADD TO GALLERY. Click it and upload the photos you want (or grab them from your library). You’ll be able to rearrange.
5. If you don’t like the way it’s displaying, you can easily change the format by clicking on the gallery and clicking the little picture icon. Just change the format!
POSTING A PHOTO FROM ANOTHER SITE
Sometimes it isn’t necessary to upload a photo from your computer if it’s already on another site. To grab a photo this way, use the insert from URL feature.
1. Place your cursor where you want the picture to go.
2. Click add media.
3. On the left hand side, click insert from URL. You’ll need the image URL of the photo. To get it, go to the website that has the image. Right click on it and choose the option that says Copy IMAGE URL.
4. Paste it into the field. A bunch of options will display. One of those options allows you to link right back to the original source of the image. It says link URL. You can choose to have it go nowhere, or back to the site you got it from!
UNDERSTANDING THE MEDIA LIBRARY
The media library is where all your images live. Some people like to upload their photos to the media library first, and then grab them for posts. It’s a fine way to do it, but I typically choose the other way.
Sometimes, WordPress doesn’t grab all the images from the media library when you’re working in a post, and it can be frustrating. That said, there are LOTS of times when you need to put something in your library first.
When you want to display an image on your sidebar.
For example, most people have the image (jetpack) widget. It doesn’t allow you to directly upload an image into the widget, but rather you have to grab the image URL. To find your image URLS, go into your media library, search for the photo, and then click edit. The image URL will be on the right hand side. Every single image has an entire page dedicated to it. You can add all sorts of information to your image, even SEO. If you have the SEO by Yoast plugin, you can pimp out those images.
CHANGING THE GLOBAL SETTINGS IN YOUR MEDIA LIBRARY
1. Go to settings, and then click on media.
2. You can change things like the default thumbnail size, whether or not your carousel is black or white, and whether to allow the metadata to show up under the image. I leave the box unchecked that says cool mosaic. I can still have that option, but I get to choose it manually, rather than having it do it for me all the time.
USING THE FEATURED IMAGE OPTION IN WORDPRESS
Here are a few important things to know about the featured image option.
1. Use it!
2. If you have a photo in the featured image option, it won’t display IN the post. This is handy because you can use a featured image that displays on the homepage or Facebook that you may not want to have in the article itself.
3. Featured images are necessary if you are using grids in a framework like Prophoto. It also is useful when you have your blog homepage set to excerpt. This way, it grabs just a portion of your text and your featured image.
4. To upload an image to the featured image slot, look on your post screen on the right (towards the bottom). Click on set featured image. You can grab an image already in your media library or upload a new one
MY NUMBER ONE ADVICE FOR UNRULY IMAGES
WordPress can be a PAIN IN THE BUTT with spacing, so here’s my advice. Write your post. Put a little text where-ever you want the image to go (insert image here). Then at the end of your post, go back and put the images in. Why? Because if you start uploading images as you’re writing, the spacing can go wonky tonky. It’s much easier to wait until the end and place all your photos at once.
For users of Prophoto:
I know I have a lot of clients running this framework. You have additional options not listed here– mainly lightboxes and slideshows. I won’t cover it all in this article but one piece of advice– always upload photos from your computer when creating a new gallery. Prophoto doesn’t make it easy to grab images that are already uploaded.
IS THERE AN IMAGE QUESTION I DIDN’T ANSWER? Find me on Twitter or Google + and let’s chat!
Find more posts in WordPress…


