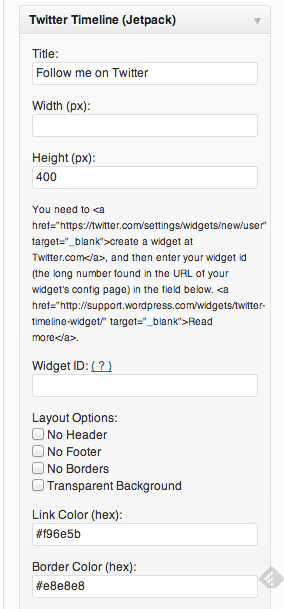
If you use Jetpack, you may have missed the notice that the Twitter widget is going buh-bye. Twitter has changed its terms and protocol for widgets, so we bloggers have to use the new widget.
The process is a bit different than simply typing in a Twitter handle. Here are the steps. Keep in mind, this tutorial assumes you use Jetpack…AND that you’ve updated it to the latest version. 🙂
1. Have two tabs open. Your Twitter page on one, your dashboard on the other.
2. Go to appearance and then widgets. Drag and pull your old Twitter widget off of the sidebar. In the box of available widgets, you should see something that says Twitter Timeline (Jetpack). This is the new widget.
3. Drag it over to your sidebar and it should pop open.
4. On the other tab, open up your Twitter profile. Click on “edit” profile and then on the left side, you should see an option that says Widgets. Click on it.
5. Click Create new (it’s on the right).
6. On the left side are the configuration options. On the right is how it looks. Just leave the defaults the way they are and click save changes.
7. Code will appear in a box down on the right. You have to look into the code until you find a long string of numbers labeled your ID.*It’s important to note that you could simply grab that code and put it in a text widget but the widget we’re using simply needs an ID.*
8. Copy and paste the code into the ID box on your WP dashboard.
9. Click save. View your site to see how you like it. If you want to make visual changes, simply go back to the widget and play around with the options.
There are some cool new features with this widget. In addition to more visual control over style, it allows your readers to tweet you right from your blog. People can retweet, reply, or favor your tweets as well. In essence, it’s a mini-twitter on your sidebar.
The standard follow button is there like before.
Here’s a screenshot…
Hope this helps get your blog tweeting back in business.


