Congratulations. You are the proud owner of a URL custom domain and server. Now it is time to get cracking!
If you listened to my sage advice and signed up with WebHosting Hub, you can follow the instructions below. For each different host, it is going to be a little bit different. Some hosts will already have the script available, whereas others will require you to upload it yourself. If that is the case, you should first download the software directly from WordPress, and then upload it to your server.
Here are the step-by-step instructions for those who went with my partner company.
Before you start, put yourself in one of the following categories:
- I am starting fresh with a new domain and new hosting company.
- I am starting fresh with a hosting company and I already changed the nameservers so it’s with WebHosting Hub.
- I have a site already using that domain and don’t want to pull it down until the new one is ready!
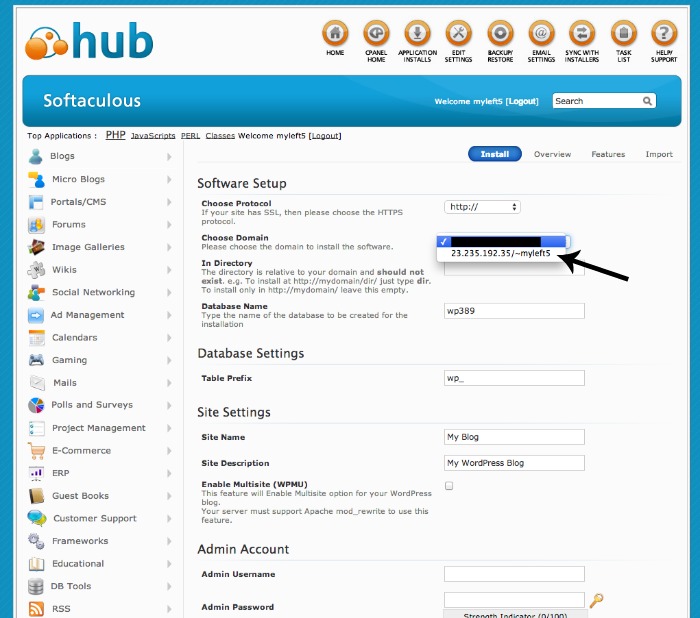
Numbers 1 and 2, keep on reading. If you’re in category three, you want to set up WordPress on a temp URL which looks like this: http://20.200.200.200/~usernam/ or something similar. I’ll star where you need to pay attention.
- Login to your account.
- Looking at the screen, click on the cPanel.
- Go to where it says WordPress and click! Then hit the install button.
- Here’s where you have to pay attention. If you were in category 3, make sure you choose your temp URL and not your MAIN DOMAIN!* If you were in cat. 1 or 2, go ahead and install it on your main domain.
- You can leave the defaults as they are for the most part. Just fill in your email and password (and I recommend using your email as a login name because it’s more secure).

Click install and within a few minutes, your WordPress site is ready! Once it’s done, to access your website, you will always type in your URL plus /wp-admin. So for example, fabulousblogging.com/wp-admin. Then enter your username and password and you will inside your new site.
Yeah!!
The next step: Install some plugins!
*this post contains affiliate links*
